This article describes implementation of a custom HTML resource for bulk importing records in a CSV file into the dynamics 365 web application. This proved to be a good option when the data importing was not sufficient for creating and/or appending to multiple record types
Specifically this scenario will support importing multiple opportunity records, and will also create the associated contacts and accounts if no matching record exists in the system
This will also cover implementing the following dynamics CRM component types with my visual studio extension detailed here
- Custom workflow activity
- JavaScript calling dynamics 365 web api to invoke a custom action
The source code described in this article is accessible here
Requirements
Lets define some loose requirements
- The user should be able to import a CSV file to create multiple Opportunity records
- Columns required are
- First Name
- Last Name
- Mobile Phone
- Business Phone
- Company
- Topic
- If a contact already exists for the email address, then that contact should be used for the opportunity and its details should not be updated. Otherwise a new contact should be created
- If an account already exists with the Company name then it should be used for the opportunity. Otherwise a new account should be created
- Any new Account created by the importer should have its Relationship Type set to prospect
- Hyperlinks should be displayed for each record created to allow opening
Solution Design
Okay lets break down a solution. A NASA landing craft this ain’t so I’ll just list them out. I don’t think any diagrams or other such things are necessary
- HTML web resource
- A button to download a CSV template
- A button to select and load a CSV file
- Display of the loaded CSV data prior to processing
- A button to Run the import
- Display of import progress and results
- JavaScript web resource implementing logic behind the HTML
- Loading a CSV file for display in the User Interface
- Looping through and creating each opportunity while displaying progress
- Custom workflow activity
- This will contain the guts of the opportunity creation
- It will take the JSON for a CSV row, process it, and return relevant details
- Technically this could all be done in JavaScript however writing C# code is more pleasant than JavaScript and has various advantages for scripting tests, using transactions and using existing code libraries
- Custom action
- This will basically connect the dots between the JavaScript and the Custom Workflow Activity
- It will be called by JavaScript for each opportunity, invoke the custom workflow activity and return the results
Visual Studio Solution
The first step for this is creating a new Visual Studio solution based on the JosephM Xrm Solution template which is installed as part of the JosephM.Xrm.Vsix extension. I will not go through that detail here. If necessary this is detailed in the article here
The following will just details the main components.
HTML Web Resource
Okay so the HTML defines the user interface elements. All processing logic will be defined into the JavaScript file which is referenced
In terms of the content there is not much to it
- A heading section with some brief details
- A fileselector div which is to be displayed initially, then hidden when one is selected. This also contains a hyperlink styles as a button for downloading the csv template
- An import div which is to be displayed when a CSV has been loaded. This contains the progress bar, a Run Import button, and will be populated with displaying of the CSV content by JavaScript when the CSV is loaded
Note that
- ClientGlobalContext.js.aspx is referenced in the header. This is required for loading the dynamics context and authentication
- Jquery.ui is referenced and used for instance to display a progress bar
- The naming convention jmcg_bis_* is used to avoid naming conflicts with any other solutions I create in the instance with the same jmcg prefix
- The CSV columns are hard-coded into a hyperlink for the Template Download. There may be other ways to do this not hard-coded in the HTML but this was just the first way I got it to work in all browsers I checked
- An additional file jmcg_bis_custom.css is also added for some styling
- Several images have been added which will be used for visualising processing, error and success states

JavaScript Web Resource
Okay so the JavaScript basically contains these things
- A document.ready function to initialise several UI elements
- A csvLoader.handleFileSelect method to load the data when a file is selected. Basically it parses the CSV content into JavaScript objects, then generates html to display it in the UI
- A csvLoader.DoImport method to iterativelly create records for the loaded data when Run Import is selected. This recursively calls an action in the web API for each JavaScript object created for the CSV data (using the jmcg_bisWebApiUtility library which was added to the project when initially created). The WEB API error/success callbacks are used to display the result with any error, as well as add a hyperlink, then re trigger the method for the next row
- A csvLoader.CSVToArray method called by the csvLoader.handleFileSelect method. This code I got off some dude on the web who had already written code to parse a CSV into JavaScript objects

For more detail see the source code
Custom Workflow Activity
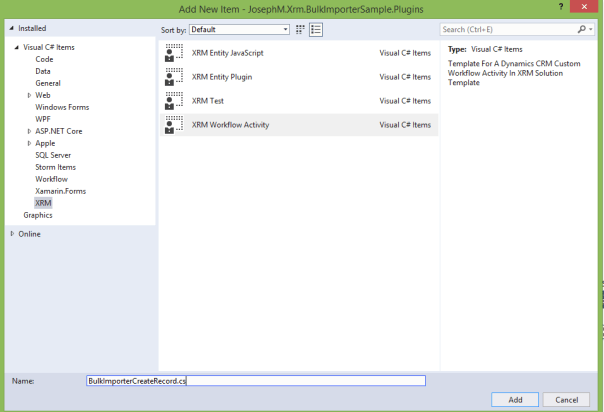
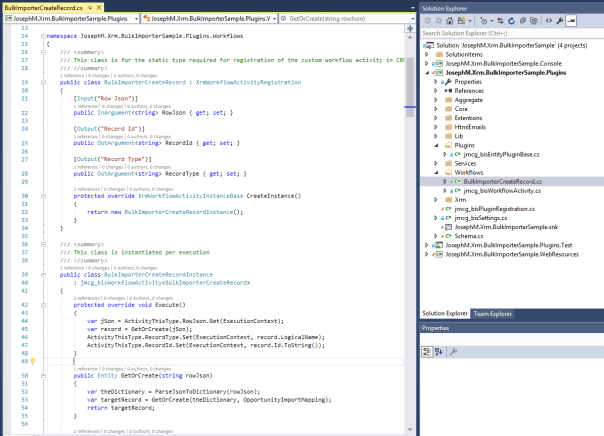
Code for the custom workflow activity is in the “BulkImporterCreateRecord.cs” file as shown in the subsequent screenshot. It was created based on a project item template installed as part of the visual studio extension and uses base classes for simplifying code and allowing creation of workflow instances in test scripts
Note there are actually 2 classes in this file. The SDK type for custom workflow activities is not thread safe and cannot use extended properties or variables for each execution instance. This 2 class approach is a pattern I have settled on and it works well for me
- BulkImporterCreateRecord – this is the ‘Registration’ object. It is used to register the custom activity type in the dynamics instance for use in a workflow, and contains properties for the Input and Output parameters as per the standard SDK approach
- BulkImporterCreateRecordInstance – this class for the guts of the logic. It is created and spawned by the BulkImporterCreateRecord class, processes the guts of the logic, and sets results in the BulkImporterCreateRecord output parameters. Concerning the actual logic to create the records etc. I guess there are hundreds of ways to do this. I just used a relatively simple and flexible approach where I define maps between CSV columns and types/fields for record creation. This means it is simpler to adjust the mappings if required, as well as I think it makes the mappings and logic simple to read
- I have used a ‘Key’ property in the mapping metadata to match contacts by email address, and ensure opportunities are not duplicated for the Topic/Contact/Customer
See the source code for more details
Custom Action
As mentioned this simply connects the dots between the client side JavaScript, and the server side C# code
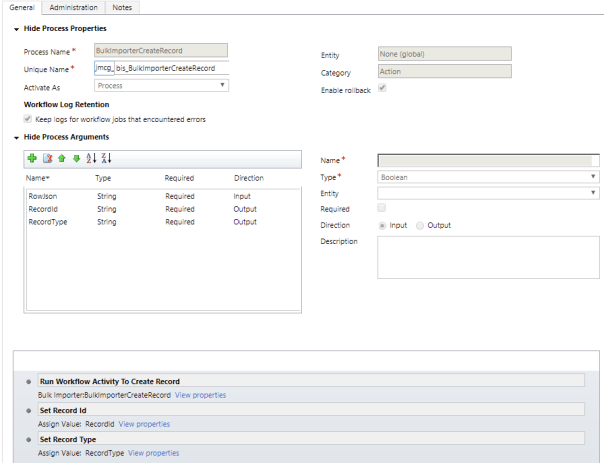
- To create an action open the solution in the dynamics web application, click Processes in the left hand navigation, click New then select Category=Action
- It is a global action type as it does not have a record context, it just takes a string as input
- Enable Rollback is checked
- Input/Output arguments are used to pass the JSON into the custom workflow activities input parameter, as well as map the custom workflow activities output parameters to the output arguments of the action
- Record Id, and Record type are separated as output arguments just make it flexible if the type of record is changed, or other types are used
Test Script/Debug Of C# Code
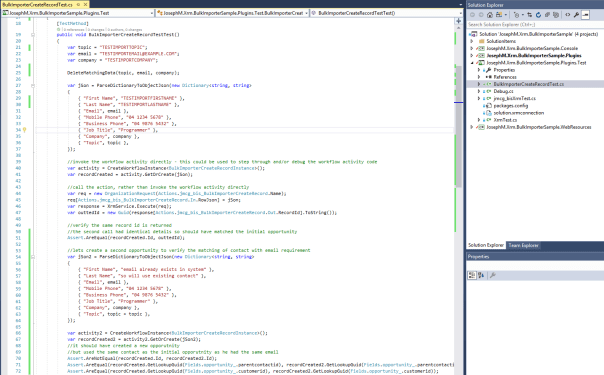
As I am conditioned to doing I also add a script for the custom workflow activity code
In reality this was used for debugging the guts of the record creation because the first time I wrote the custom workflow activity code it did not work
It also provides the benefit of adding a regression script to the solution. If for example a new enforced required field was added to accounts or opportunities which caused the imports to fail, if this script was a part of a suite of test scripts for our holistic solution then it would get picked up and we would identify that we need to adjust something to have it work again
The code is shown below. Basically it just passes some JSON to the custom workflow activity class and verifies the records are created, then calls it again to verify duplicates are not created
Possibly more scenarios and assertions could be added but I will deem this sufficient for this article
See the source code for more details
End Result
Okay now going through the Custom HTML page it all seems to work as in these screenshots. This HTML resource can now be added to the sitemap, or a dashboard, for accessibility by users in the web application
My CSS and styles are pretty basic and I don’t claim to have much in terms of design skills. Time could be spent to pretty up the user interface, but I tend to just concentrate on the functional aspects
This is the initial display
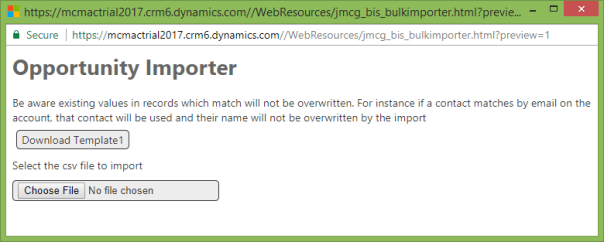
After clicking Choose File and selecting a populated CSV file
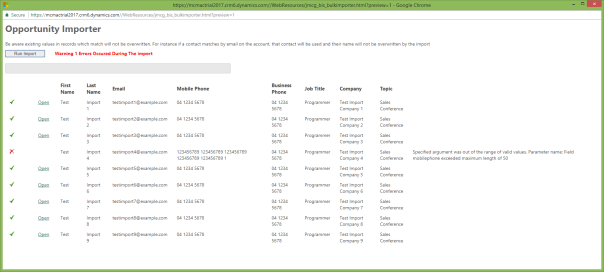
Note I have a phone number exceeding the maximum characters just to confirm this error is displayed
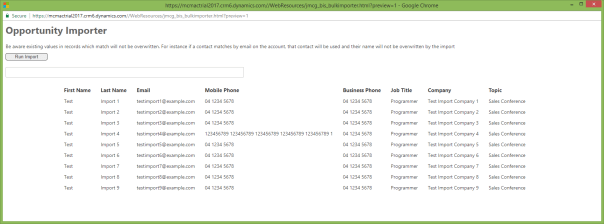
After clicking Run Import the system has proceed through each and displayed the progress, as well as error details and hyperlinks to open the opportunities in dynamics 365
Reviewing the requirements I believe I have met each of them with this solution
VSIX Benefits
To wrap this up the Visual Studio Entension provided the following benefits when implementing this solution
- Creation of the Dynamics 365 solution during Visual Studio solution creation
- Starting with a solution template containing JavaScript and C# libraries to simplify coding and testing
- One click bulk creation and updating of web resources. Without it each web resource (CSS, Image, JavaScript) etc would have to be created and imported one by one in the web application
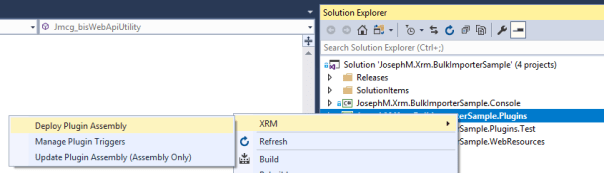
- Deployment of the custom workflow activity in Visual Studio without having to use the SDK Plugin Registration Tool
- Automatic adding of the Web Resource and Plugin Assembly components into my Dynamics 365 solution
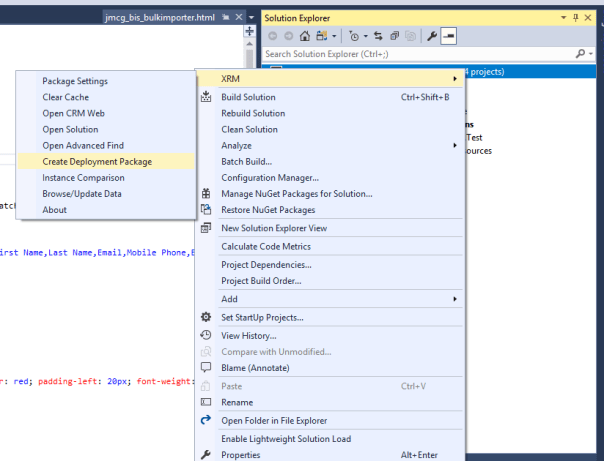
- Navigation to the Dynamics 365 solution for creating the custom action via the solution explorer right click solution menu (Open Solution)
- Adding the Dynamics 365 solution to the Visual Studio solution/project via the solution explorer right click solution menu (Create Deployment Package)